

Goal: complete the minimum setup needed to create a real customer, send a quote, convert it to an order, and collect payment.
1
Set up your business information
Your business name, logo, currency, and tax rate appear on every quote, invoice, and report the CRM generates. Getting this right first means everything downstream looks professional from day one.Go to Settings → Business Info and complete:
- Business name and contact details (phone, email, address)
- Currency and tax rate
- Timezone — this affects scheduling, calendar display, and report periods
- Logo — appears on PDF invoices and the booking page
2
Build your service catalog and body types
Your service catalog is what you sell. Every quote and order is built from this list, so it’s worth setting up correctly before you create your first estimate.Add your services: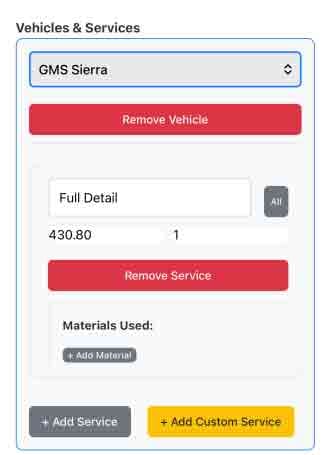
- Go to Settings → Services & Pricing
- Add each service with a name, base price, and estimated duration
- Mark services as bookable if they should appear on your public booking page
- Enable Body Type Adjustment on services that should use vehicle surcharges
- Still in Settings, open Vehicle Body Types
- Add the types you service (Sedan, SUV, Truck, Van, etc.)
- Set a surcharge percentage for each type — eligible services use it when that body type is selected on a quote or order
3
Create your first customer and vehicle
Now you’re ready to create a real record.
- Go to Customers and click Add
- Enter the customer’s name and phone number — these are the minimum required fields
- Add email and address if you have them
- Save the customer, then open the profile
- Click Add Vehicle and enter the make, model, year, and body type
4
Send a quote
With a customer and vehicle in place, you can build your first estimate.
- Go to Quotes and create a new quote
- Select the customer — their vehicles appear automatically
- Select the vehicle and choose which services to include
- The CRM calculates the total with applicable body type surcharges and tax
- Add a discount, tip field, or extra fees if needed
- Save as Draft while you review, or move to Sent when it’s ready
5
Convert the quote to an order
When the customer approves the work, converting the quote takes one click.Open the quote and click Convert to Order.The order is created with all the same vehicles, services, and pricing from the quote. You can then:
- Assign it to a staff member
- Schedule it on a specific date and time
- Add materials as the job progresses
- Attach before-and-after photos
6
Complete the job and collect payment
When the work is done:
- Update the order status to Done — this triggers inventory deduction and COGS recording
- Review materials and confirm all line items are correct
- Collect payment using one of the available methods:
The order updates to Paid automatically and the revenue appears in your dashboard and Insights reports.
What to set up next
With your first successful workflow complete, these are the highest-value next steps:Invite your team
Add staff members, set their roles, and control what each person can access.
Set up the booking page
Let customers book and pay online without calling you.
Connect calendar sync
Sync with Google or Apple Calendar so your team always has the full picture.
Review your first report
Confirm that revenue, COGS, and profit are tracking correctly from day one.